What if we equipped ortholinear keyboards with a mysterious column stagger? To clarify, the previous post about ortholinear keyboards titled Ortholinear Keyboards described keyboards without row stagger. This layout is a step towards ergonomics, as it is more natural and aligned with the anatomy of our hands and fingers. In this post, however, I want to go a step further than ortholinear keyboards and consider how such a keyboard layout can become even friendlier to our hands. We will use an ergonomic keyboard equipped with column stagger.
What is row staggering, why was it introduced, and why is it unnecessary in you can read in QWERTY Keyboard and Its 2 Flaws?
What Is Row Stagger, Why Did It Originate, and Why Is It Unnecessary in QWERTY?
First, I would like to recall the sketch presented in the previous post showing our hands.

And an ortholinear keyboard:

Thanks to the removal of row stagger, fingers move only along the vertical axis while typing, which aligns with their natural movement. But what if we take one step further and consider another feature of our hands—the different lengths of fingers? We are used to keyboards with keys aligned evenly in rows, but if you think about it, it does not have to be that way. Fingers of different lengths rest on the Home Row in a straight line, which is not entirely natural for our hands.
Try this test: relax your hand and tap all your fingers simultaneously on a desk or other flat surface. After one tap, do not lift your hand, and observe how your fingers are positioned. Are they in a straight line? Most likely not. The middle finger is the highest, and the two smallest fingers, starting from the ring finger, are lower.
So why not consider this feature of our hands in keyboard design? Is it impossible? It is possible! This leads us to the next section.
Column Stagger

The image above shows a keyboard with removed row stagger but applied column stagger. Each column of this keyboard starts and ends at different spatial points. The key width and height are the same, but the beginning and end of consecutive columns are located at different heights. When we observe the height differences between columns, we notice a similarity to the previously conducted hand exercise.
In short, if you performed the previous test on an ortholinear keyboard instead of a desk, when resting your hand on the keyboard, your fingers probably would not sit properly on the keys. Performing the same test on a column staggered keyboard causes the fingers to rest near the center of the keys, or at least not on their edges.
I should also explain that the layout shown in the previous image also includes a split keyboard design, where each hand has its own set of keys. Additionally, the keys are angled, not aligned straight as in ortholinear keyboards, which is another ergonomic improvement. I won’t elaborate here since the next post will cover this.
Column Staggered Keyboards in Practice
To illustrate the real impact of column stagger on ergonomics, I will use a photo of a hand with colored fingertips—this is the same image used in the post about Ortholinear keyboards.

Recall how the key assignment to individual fingers looked on an ortholinear keyboard:

Similarly, I marked the keys assigned to each finger on a keyboard with column stagger:

Comparing the two images and relating them to our hands, it is obvious that a layout with column stagger is more ergonomic. It takes into account different finger lengths, making reaching for the top row with the pinky and the bottom row with the middle finger much more comfortable.
The main idea behind ergonomic keyboards is to reverse the traditional keyboard creation process. Traditionally, a keyboard design was made first due to technical constraints, and then users adapted to it. With ergonomic keyboards, the layout is adapted to the human hand first, and then the keyboard is designed based on these characteristics.
You have to decide for yourself which solution is better and which keyboard your hands would like to spend the next years with.
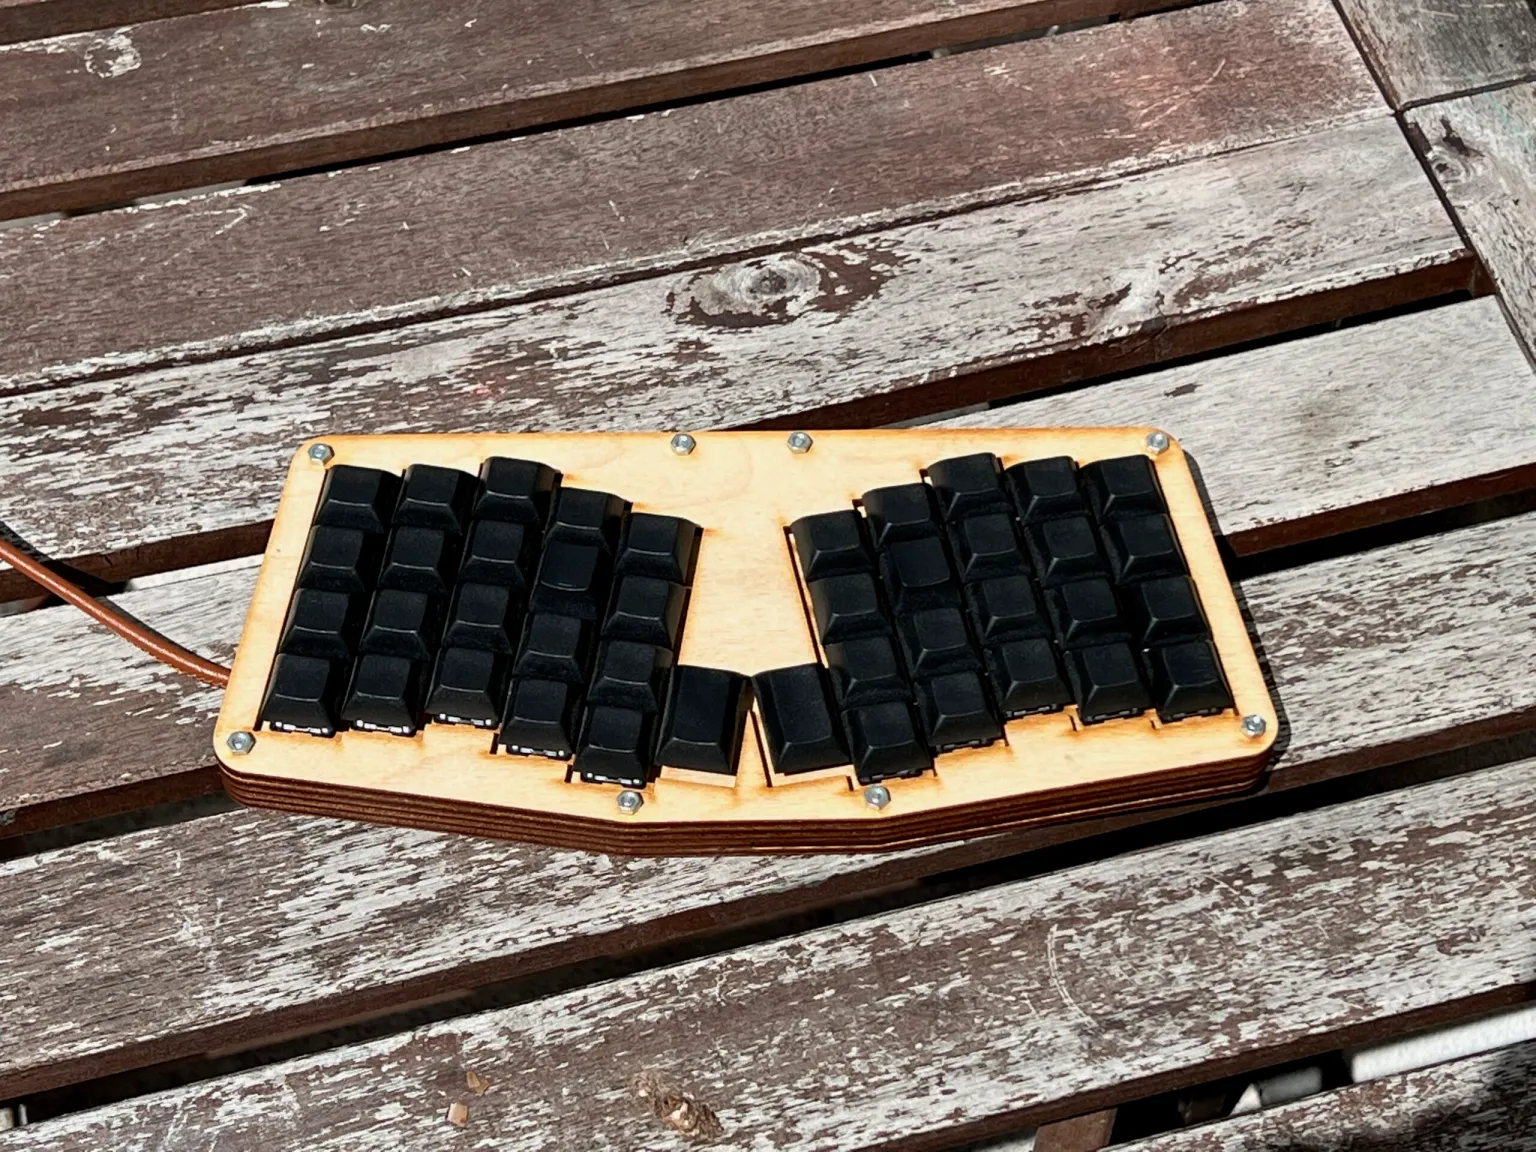
Real-Life Example
Theory is one thing, but what can such a keyboard look like in reality? Truthfully, similarly to the layout shown above, namely:

Here is my Atreus, designed by Phil Hagelberg. Having a parts list, I could gather all components, and the case was custom-cut at a local woodworking workshop. Atreus is my first self-built keyboard, and I hold it with special fondness because it started my passion.
Currently, you can buy the second version, which is no longer handmade but produced commercially. Here is the link to the shop.
My Layout
For the curious, here is a photo of my layout on the Atreus. If anyone is interested, I could describe the full layout in a separate post—all layers, their purposes, and why the activation key for each layer is exactly where it is.

To conclude, I currently have the 24th version of my Atreus layout. This is the power of fully programmable keyboards. You decide what each key does and adapt the keyboard to yourself, instead of learning a key layout designed by someone else. Each of us has different needs and preferences.
☕ Support
Enjoy the insights, guides and reviews? Buy me a coffee to fund more ergo-keyboard research and guides.
Thanks for reading!
Bartosz