If you are searching for a split keyboard, you are probably asking one of three questions:
- What is a split keyboard, and why do people say it is more ergonomic?
- Which type should you choose: semi-split, one-piece split, or a true split keyboard?
- Is the comfort improvement worth the learning curve?
Short answer: a split keyboard separates the left and right hand zones so your wrists and forearms can stay straighter while typing. For many people who type for hours every day, it is one of the most noticeable ergonomic upgrades you can make.
What Is a Split Keyboard?
A split keyboard is a keyboard divided into two dedicated halves: one for the left hand and one for the right hand.
The split can be small and fixed inside one physical keyboard, or it can be a full separation into two independent halves. In both cases, the goal is the same: stop forcing your hands into the narrow, inward-turned posture of a standard rectangular keyboard.
A split keyboard is a keyboard divided into two dedicated halves - one for each hand. Pressing a key that belongs to the opposite half with the wrong hand is not possible without lifting your hand off the desk.
That physical separation is the defining characteristic. Other features, such as ortholinear layouts, column staggering, thumb keys, tenting, or wireless support, can be added on top - but they are not required for a keyboard to be split.

Why Standard Keyboards Cause Problems
Let’s consider the standard ANSI QWERTY keyboard, which is still the most popular layout worldwide and the default for most laptops.
When you look at it from an ergonomic perspective, two problems immediately stand out:
- Your wrists and forearms angle inward toward the center of the keyboard.
- Because there is no physical split, it is easy to use one hand for keys that should belong to the other hand.
Ergonomic Misalignment
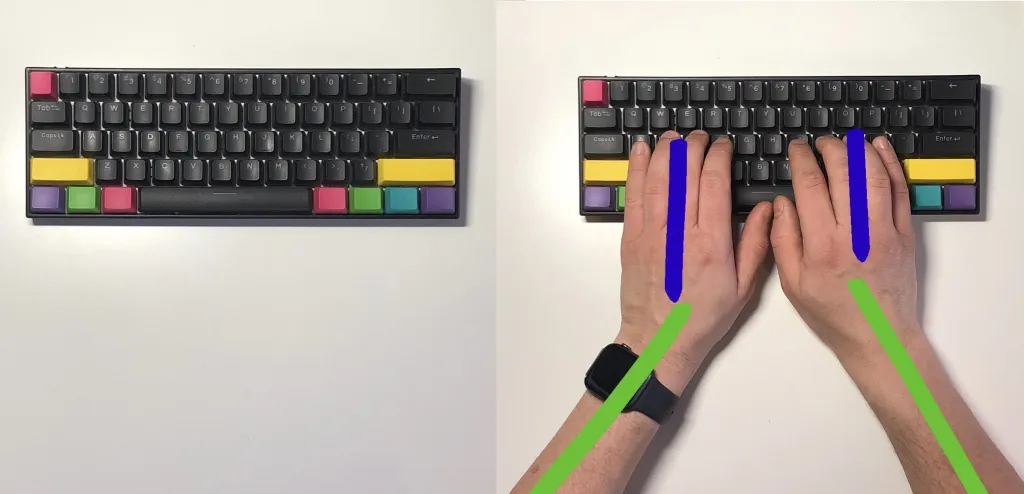
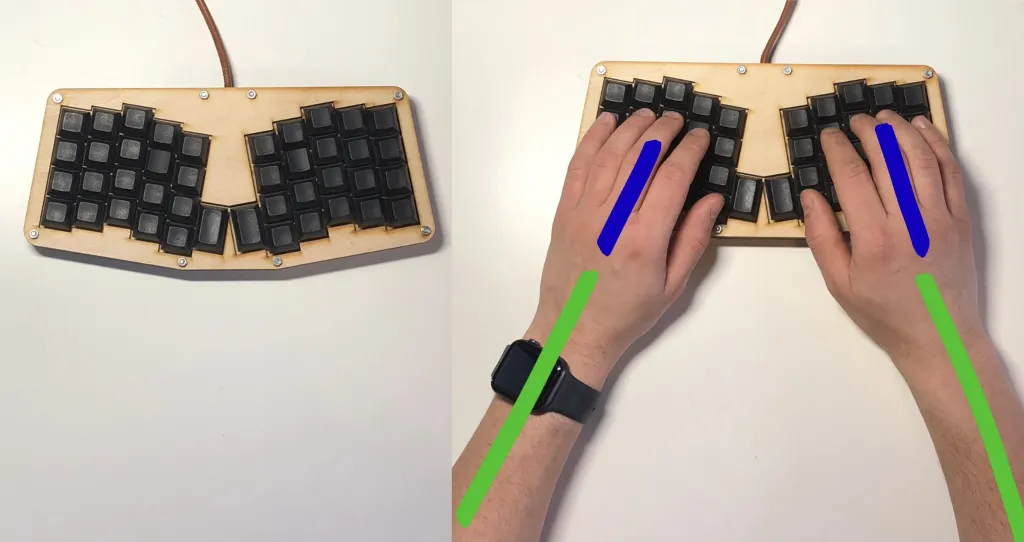
Take a look at the image above. The left side shows a standard keyboard, while the right overlays hand placement. I marked forearms with green lines and hands with blue for clarity.
Notice how the arms and wrists form a funnel shape. Forearms turn inward, and wrists bend outward just to place fingers on the home row. This position is common, but it is not neutral. During long typing sessions, that small angle can contribute to shoulder tension, wrist fatigue, and general discomfort.
One Hand Helping the Other
The second issue - which does not apply to perfect ten-finger typists as much - is using one hand to press keys intended for the other.
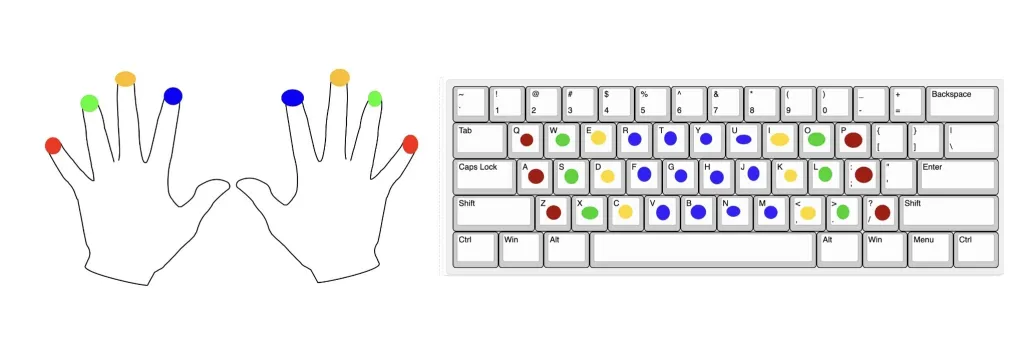
In the diagram above (which you may recall from earlier posts), I marked corresponding fingers with matching colors. Notice how the blue keys, assigned to the index fingers, sit right next to each other. For people who don’t type correctly with all ten fingers, this creates a temptation to use the wrong hand.
A personal confession: I often struggle with T and B. Technically, both are assigned to the left hand, but I frequently hit them with the right - especially when the preceding or following character is far left, or when I’m pressing Shift.
This is one of the subtle but significant issues that split keyboards solve. They make the hand zones obvious.
Split Keyboard Benefits
The main benefit of a split keyboard is not that it looks unusual. The benefit is geometry.
Straighter Wrists
With a split keyboard, each half can sit closer to the natural line of your forearm. This reduces ulnar deviation - the inward wrist bend that appears when both hands must crowd around the center of a standard keyboard.
More Relaxed Shoulders
A true split keyboard lets you place the halves closer to shoulder width. Your chest can stay more open, and your shoulders do not need to collapse inward just to reach the home row.
Cleaner Typing Technique
The physical separation discourages cross-hand typing. If a key is on the left half, the left hand should press it. This makes split keyboards useful not only for comfort, but also for rebuilding better typing habits.
Better Setup Flexibility
On a true split keyboard, you can adjust:
- Distance between halves
- Rotation angle
- Tenting angle
- Mouse or trackball position between the halves
That flexibility is hard to get from a one-piece keyboard.
Types of Split Keyboards
Not every split keyboard is the same. The word “split” covers a few designs, from gentle one-piece layouts to fully separated ergonomic keyboards.
1. Single-piece Split Keyboard (with a gap between halves)
The simplest version is a one-piece keyboard where the halves are separated by a gap.
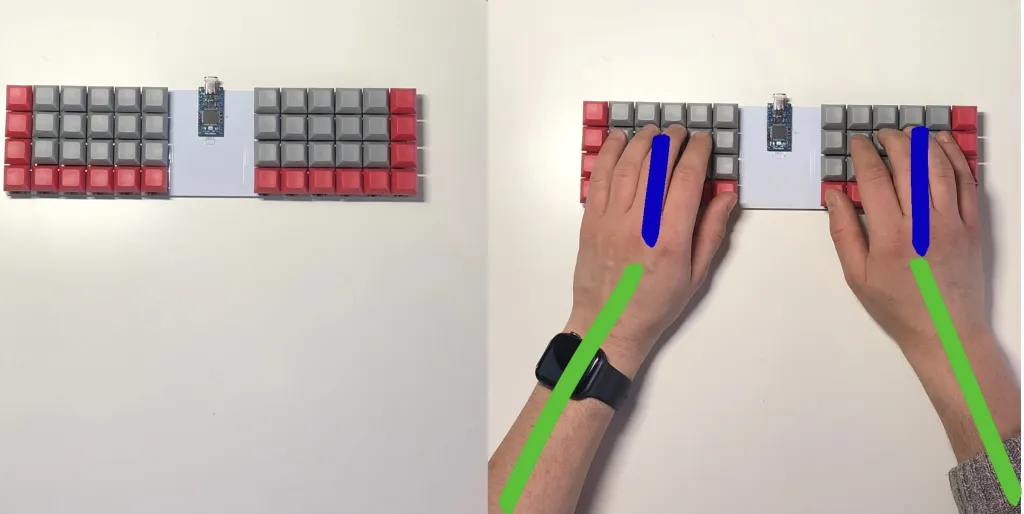
In the illustration above, you see an ortholinear split keyboard, but the same idea can be applied to a staggered layout (creating small “steps” between inner columns).
Compared to a standard keyboard, the inward funnel is wider. Forearms sit at a gentler angle, and the gap creates clearer left and right hand zones.
This type is easiest to try because it still feels like one keyboard. The trade-off is that width and angle are fixed.
2. Angled Single-piece Split Keyboard
The second type combines the gap with an angled layout - the halves are rotated outward.
With angled key clusters, your forearms and wrists align more naturally. There may still be some inward angle, but the improvement is noticeable.
This category overlaps with what I call semi-split keyboards. They are a strong middle ground if you want better wrist alignment but do not want to manage two separate halves.
3. True Split Keyboard (two separate halves)
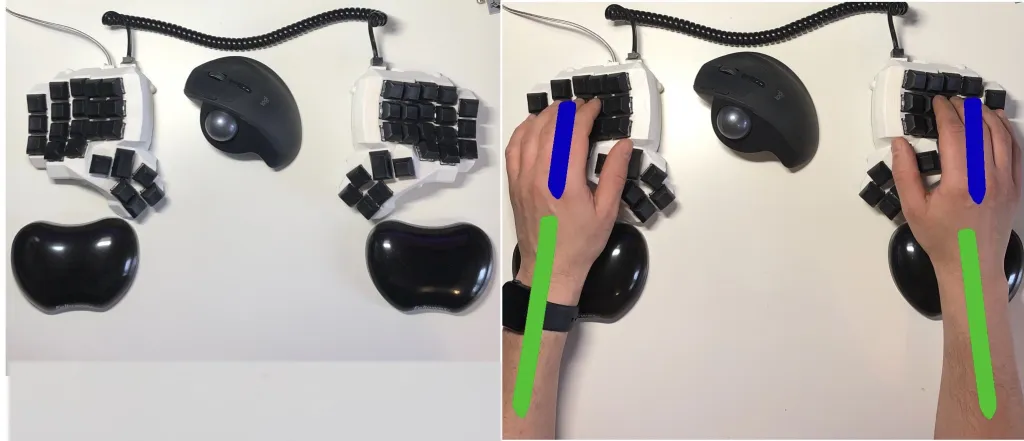
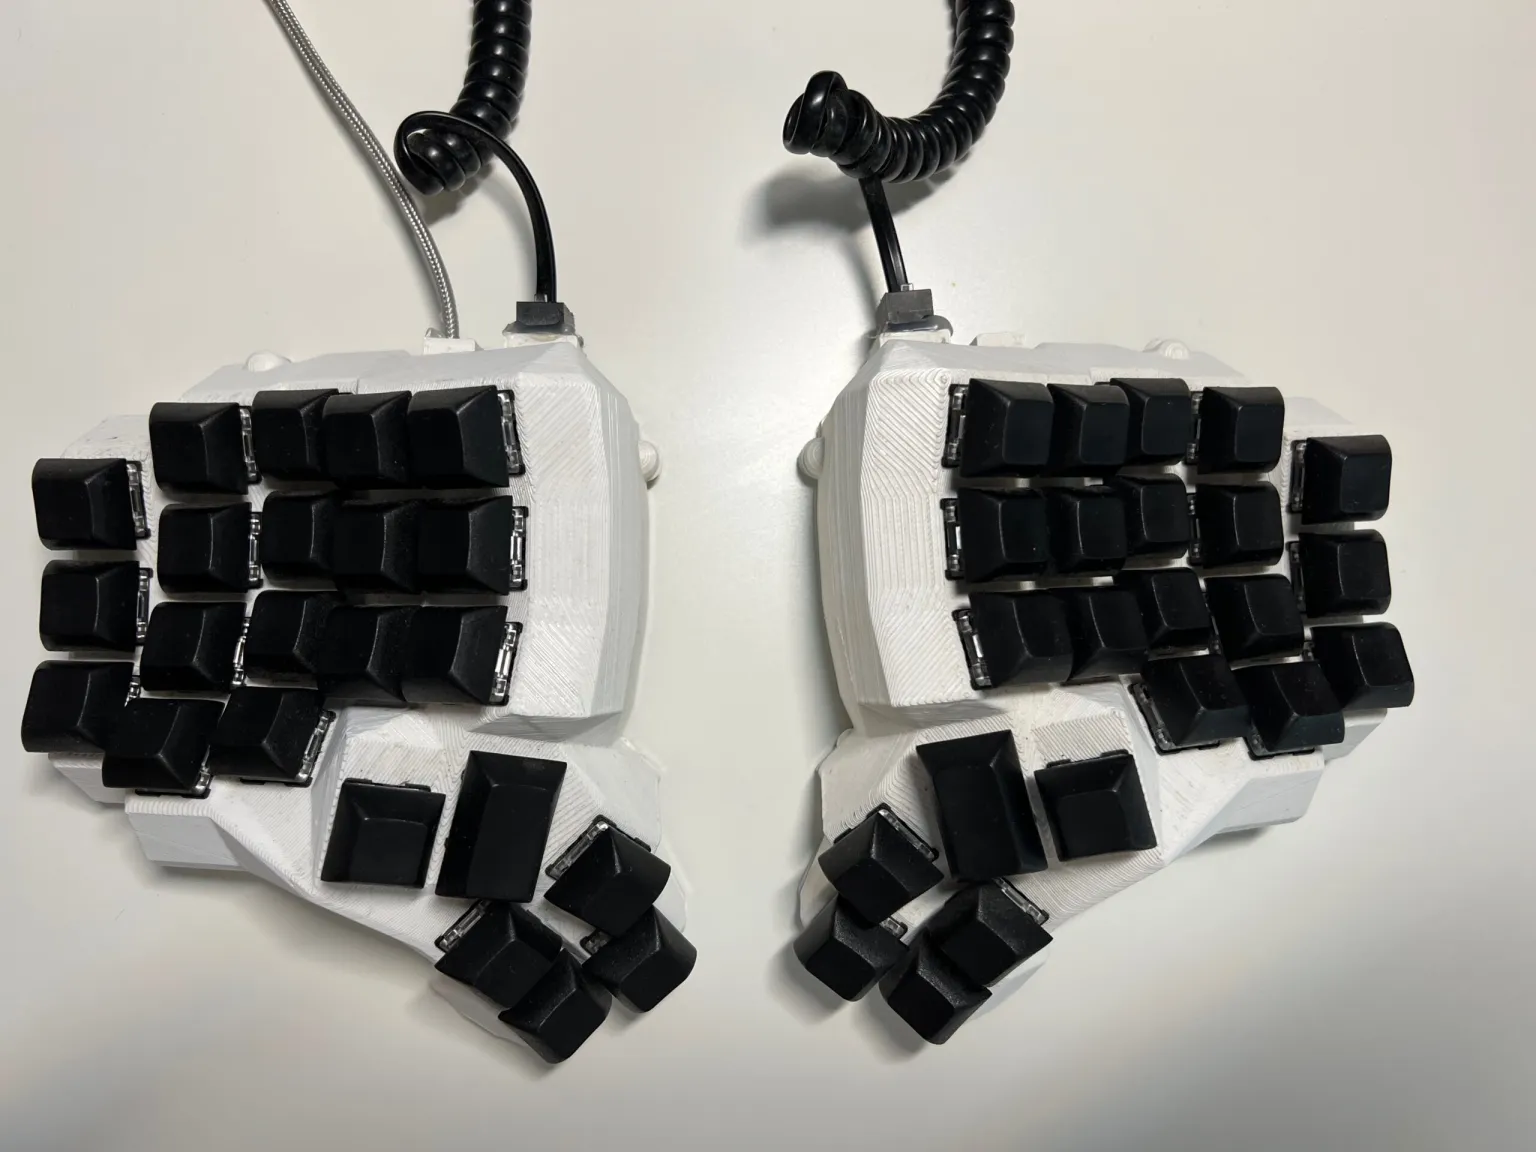
Finally, we have the true split keyboard - two physically separate halves connected by a cable or wireless (e.g., via Bluetooth).
The example above is the Dactyl Manuform.
A true split keyboard gives you the most adjustment. You can place each half where your arms naturally fall instead of adapting your body to the keyboard.
For pure ergonomic flexibility, this is the strongest design. The trade-off is practical: two halves take more desk space, more setup time, and sometimes more cable management.
How to Choose Your First Split Keyboard
If you are new to split keyboards, do not start by chasing the most extreme design. Start by choosing the right level of change.
Choose a Semi-split Keyboard If You Want Simplicity
A semi-split keyboard is a good first step if you want:
- One-piece portability
- Better wrist angle than a standard keyboard
- A layout that feels less intimidating
- Easy laptop or travel use
The downside is fixed geometry. You cannot move the halves independently. If that trade-off sounds right for you, I wrote a separate guide to semi-split keyboards and a practical Reviung41 keyboard review.
Choose a True Split Keyboard If You Want Maximum Comfort
A true split keyboard is the better choice if you want:
- Shoulder-width hand placement
- Independent angle adjustment
- Tenting options
- Space for a mouse, trackball, or notebook between halves
This is the most ergonomic direction, but it also asks more from your setup habits.
Choose Split Ortholinear If You Want a Friendly First Ergonomic Board
For many beginners, the sweet spot is a split ortholinear keyboard. You get separated halves plus a simple grid layout, without immediately jumping to tiny 34-key boards or complex sculpted key wells.
That is why I often recommend Let’s Split as a practical first split keyboard. It gives you real ergonomic benefits while keeping enough keys to avoid heavy layer dependence in the first weeks.
For a broader starting point, read Best Ergonomic Keyboard for Beginners.
Split Keyboard Setup Tips
A split keyboard only helps if you set it up well. Many people buy a split keyboard, place both halves almost together, and then wonder why it does not feel different.
Start Wider Than a Normal Keyboard
Place the halves roughly in line with your shoulders. You do not need an extreme distance. The goal is simply to avoid pulling your arms inward.
Rotate the Halves Slightly Outward
Angle each half so your forearm and wrist form a straight line. Do not force your wrists to bend toward the center.
Keep Your Mouse Close
One advantage of a split keyboard is that you can place a mouse, trackball, or touchpad between the halves. This keeps your pointing device closer to the center of your body and can reduce shoulder reach.
Experiment With Tenting
Tenting means raising the inner edge of each keyboard half so your hands are less flat against the desk. Some people love it; others prefer a flatter setup. Start with a small angle before trying aggressive tenting.
Give Yourself a Few Days
Do not judge a split keyboard in the first ten minutes. Your body may like the posture before your brain likes the new layout. Give it a few days of normal work before deciding.
Downsides of Split Keyboards
I’ve used all of the above as my daily drivers over the years. Honestly, the only consistent downside I’ve found is typing with one hand.
For example, when watching online courses with a cup of coffee in hand, one-handed typing becomes inconvenient. On a standard keyboard, you can easily stretch across. On a true split keyboard, that’s nearly impossible.
Another challenge shows up in video and audio editing. In my workflow, one hand controls the trackball, while the other should operate shortcut keys on the keyboard. On a true split keyboard, this slows things down because every action is tied to a specific half.
Of course, professional editors often rely solely on the keyboard, making this a non-issue. But for hobbyists like me, who still mix in mouse/trackball use, it adds some friction.
Other drawbacks to consider:
- Desk space: true split keyboards need room for two halves.
- Setup friction: travel and shared desks are less convenient.
- Learning curve: thumb keys, layers, and non-standard key counts may take time.
- Cost: niche ergonomic mechanical keyboards are often more expensive than standard boards.
These drawbacks are real, but they do not cancel the ergonomic benefit. They simply help you choose the right type.
Best Split Keyboard for You: Practical Recommendations
There is no single best split keyboard for everyone. The best choice depends on how much change you want to accept.
For the easiest transition, choose a one-piece or semi-split keyboard. You get improved wrist angle and clearer hand zones without separate halves.
For the strongest ergonomic benefit, choose a true split keyboard with adjustable placement. This is the better long-term direction if you type for many hours every day.
For a beginner-friendly DIY or mechanical option, consider a split ortholinear board such as Let’s Split. It is not the most advanced ergonomic keyboard, but it teaches the key ideas without being too punishing. If you are comparing first options, start with my guide to the best ergonomic keyboard for beginners.
For maximum ergonomic shaping, look at sculpted split keyboards such as Dactyl Manuform or Kinesis Advantage-style designs. These add concavity and stronger thumb clusters, but the learning curve is higher.
FAQ: Split Keyboards
Are split keyboards actually better?
For many people, yes. A split keyboard can reduce inward wrist bending, allow shoulder-width hand placement, and discourage cross-hand typing. The benefit depends on your setup, typing habits, and whether you give yourself time to adapt.
Are split keyboards good for wrist pain?
They can help if your discomfort is related to wrist angle, shoulder tension, or cramped typing posture. A split keyboard is not medical treatment, but it can remove one common source of strain: forcing both hands into the center of a standard keyboard.
What is the difference between a split keyboard and an ergonomic keyboard?
A split keyboard is one type of ergonomic keyboard. “Ergonomic keyboard” is broader and can also include ortholinear layouts, column stagger, tenting, concave key wells, thumb keys, low-profile designs, and programmable layers.
Is a split keyboard hard to learn?
A basic split keyboard is not very hard to learn if the key layout stays familiar. The learning curve becomes larger when the keyboard also removes many keys, moves symbols to layers, or uses unusual thumb clusters.
Should beginners buy a split keyboard?
Yes, if they type a lot and are willing to spend a few days adapting. Beginners should avoid going too minimal too early. A split keyboard with enough physical keys is usually easier than a tiny keyboard that depends heavily on layers.
What is the best split keyboard layout?
For most beginners, split plus ortholinear is a strong starting point. It improves wrist position and makes finger travel easier to understand. More advanced users may prefer column stagger, thumb clusters, or concave key wells.
Conclusion
So, should you switch to a split keyboard?
- If you value healthier wrist and shoulder posture, the answer is a clear yes.
- If you often need to type one-handed or do heavy editing with one hand on a mouse, expect some friction.
Still, for most people spending hours typing every day, the ergonomic benefits of split keyboards outweigh the drawbacks.
Whether you go for a semi-split, an ortholinear split keyboard, or a fully true split keyboard, each step moves you closer to better typing posture.
Final note: I’ve been on this split keyboard journey for years, and I can say it is one of the most impactful ergonomic upgrades you can make to your workstation.
Related Reading
- Let’s Split Keyboard Review
- Semi-Split Keyboards
- Best Ergonomic Keyboard for Beginners
- What Are Ergonomic Keyboards?
- Column Staggered Keyboards
Support
Enjoy the insights, guides and reviews? Buy me a coffee to fund more ergo-keyboard research and guides.
Thanks for reading!
Bartosz