When someone asks me: “What’s a good first ergonomic keyboard?”, I usually start with two ideas:
- a split layout (for wrists and shoulders)
- an ortholinear grid (to clean up finger travel)
That’s exactly why Let’s Split keeps showing up in beginner recommendations — including in my own list in Best Ergonomic Keyboard for Beginners.
If you’re building or buying your first keyboard, Let’s Split is one of the boards I keep coming back to. Not because it’s the most exotic - but because it delivers the ergonomic fundamentals with a learning curve that doesn’t punish you, and does not make you throw it away after couple of minutes. But “recommended” and “right for you” are not the same thing. So in this post I’ll review Let’s Split in a practical way: what it does well, where it’s limited, what the build path looks like, and who should skip it.
What is Let’s Split?
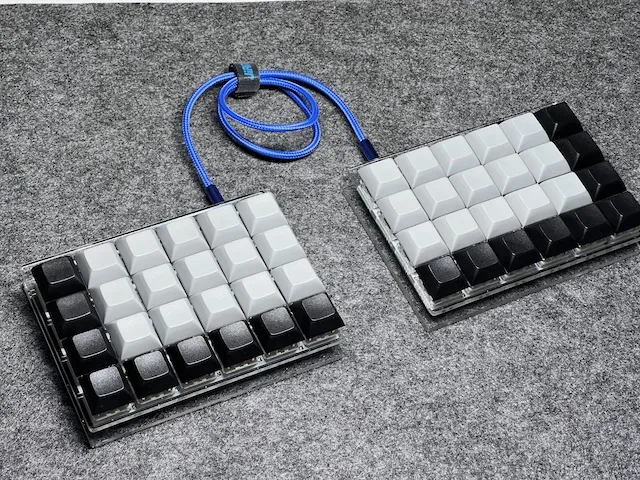
Let’s Split is a classic split ortholinear keyboard: two halves, each with a grid-like matrix of keys. No row staggering, no sculpted key wells - just a clean grid that matches the way fingers naturally move (mostly up/down).
If you’re coming from a standard keyboard, ortholinear can feel “weird” for a day or two, but it quickly starts to feel logical. And for many beginners, that logic is the point: you’re not just buying hardware - you’re buying a better typing habit.
In my experience, Let’s Split is one of those keyboards that teaches you something immediately: once you stop “searching” for keys and start trusting the grid, your hands calm down. That calm posture is the whole game.
It also sits in a sweet spot between “almost normal keyboard” and “hardcore minimalist boards”. Compared to 34-key boards like Ferris Sweep, Let’s Split gives you more physical keys, which reduces your dependency on layers in the early weeks.
If you want a deeper explanation of the underlying concepts, read:

Ergonomics: why split + ortholinear is such a strong combo
Split: the wrist improvement you feel immediately
With a split keyboard you can place the halves at shoulder width and rotate them slightly outward. That typically reduces ulnar deviation (wrists bent inward) and makes your upper body posture feel more “open”.
This is why a split layout is usually the first ergonomic change I recommend - the benefits are immediate and don’t depend on your typing speed.
Tip: Don’t judge a split keyboard after 10 minutes. Give it 2–3 days with the halves placed wider than you think. Most people start too narrow, then wonder why it “doesn’t feel different”.
Ortholinear: cleaner finger travel and less diagonal reaching
Traditional row staggering is historical, not ergonomic. Ortholinear makes your finger zones simpler: each finger mainly moves in a vertical column. Over time, that tends to reduce awkward diagonal reaches and helps you build more consistent muscle memory.
One caveat: ortholinear doesn’t automatically make you ergonomic if your layout is messy. The real win comes when you pair it with smart key placement and a bit of firmware customization.

Firmware and customization (QMK is the superpower)
Let’s Split is typically a QMK keyboard, which means you can customize:
- layers (symbols, numbers, navigation)
- mod-tap / layer-tap behaviors
- macros and combos (depending on your layout approach)
If you’re new to this world, don’t worry — you don’t need to become a firmware engineer on day one. A basic layout that keeps your common keys in familiar places is enough to get started, then you can iterate slowly.
Tip: In week one, optimize for comfort and familiarity, not for “maximum cleverness”. One good navigation layer beats five half-finished layers.
The goal is the same as always: move keys under your fingers, not fingers to your keys.
External reference:
And if you’re comparing wired vs wireless firmware ecosystems, note that QMK is wired-first; for Bluetooth builds you typically end up in the ZMK world (I talked about that more in my Ferris Sweep Wireless post).
Daily use: learning curve, comfort, and what surprises beginners
The good surprise: you don’t “need” layers immediately
The biggest beginner trap with ultra-small keyboards is going too minimal too early. Layers are powerful, but they add cognitive load when you’re still adapting to a split board.
Let’s Split gives you enough keys that you can keep:
- modifiers reasonably accessible
- common punctuation comfortable
- navigation in a predictable place
So you can focus on posture and finger travel first.
The less fun surprise: you might miss a number row (depending on variant)
Depending on the specific layout/variant you build, you may still rely on layers for numbers and function keys. This is not a deal-breaker — just something to plan for if your work involves lots of numbers, shortcuts, or CAD tools.
Comfort tip: don’t “lock” the halves too close
Many beginners place split halves almost touching — basically recreating a normal keyboard. Try going wider than that. Give your shoulders a neutral position. The split is not cosmetic — it’s the whole point.
One more practical note: if you’re switching from a laptop keyboard, expect a short adjustment period for thumb usage (space / layer keys). On split boards, thumbs do more work — and that’s a good thing, as long as the mapping is comfortable.

Build and practicality: is Let’s Split a good first DIY project?
Let’s Split is often available as a DIY PCB build (with many community variants). In practice, that usually means:
- a straightforward soldering project compared to handwiring
- many compatible case options (3D printed, acrylic, etc.)
- common controller ecosystem (depends on the PCB)
If you’ve never built a keyboard before, this is one of the more approachable entries - especially if you’re comfortable with through-hole soldering.
What I like about Let’s Split as a first build is that you can keep it simple: a basic case, stable halves, and a clean layout. You don’t need to solve everything on day one (tenting, exotic thumb clusters, advanced firmware tricks). Build it, type on it, then improve it.
If you want the “build process” mindset, my general approach is described in the Ferris Sweep build log:
Who is Let’s Split for?
Let’s Split is a strong choice if you are:
- a beginner who wants real ergonomic benefits without jumping to 34 keys
- curious about ortholinear layouts, but still want enough keys to stay productive
- willing to do a bit of layout tuning (even minimal QMK changes pay off)
It’s not ideal if you want:
- sculpted comfort (concave key wells, thumb wells)
- built-in tenting adjustments out of the box
- a single-piece board (if split feels too “different” at first)
For the “single-piece but ergonomic spirit” alternative, see my notes on Adox in the beginner guide:
EKI score (Ergonomic Keyboard Index)
I compare keyboards using my Ergonomic Keyboard Index (EKI): a 0–20 scoring framework split into Core Ergonomics (12), Practicality & Portability (5), and Buildability (3).
Here’s how Let’s Split scores in that system.
Core Ergonomics (8/12)
- Programmability: 1/1 — QMK
- Palm Stability: 2/2 — ortholinear grid + enough physical keys to keep hands anchored
- Columnar Layout: 2/2 — full grid / columns
- Column Staggering Quality: 0/1 — no finger-length column tuning
- Concavity: 0/1 — flat
- Thumb Wells: 0/1 — no true thumb cluster/well
- Split Design: 2/2 — true split with adjustable placement
- Tenting Support: 0/1 — typically flat unless you add tenting hardware
- Switch Profile: 1/1 — standard mechanical switches (varies by build, but typical)
Practicality & Portability (2/5)
- Compactness: 1/2 — smaller than full-size, bigger than minimalist splits
- Portability / Backpack Readiness: 0/1 — two halves usually need protection in a bag
- Wrist-Rest Independence: 1/1 — usable without rests (setup and posture matter)
- Hot-Swap Switch Support: 0/1 — depends on PCB/kit, but many builds are solder-only
Buildability (3/3)
- Through-Hole PCB: 3/3 — commonly beginner-friendly to solder (depending on variant)
Final EKI score: 13/20. If you want to compare this score with other boards I reviewed, open the living comparison list on EKI — it’s the fastest way to see where Let’s Split sits on the “beginner-friendly vs max-ergonomic” spectrum. And you — would you start your ergonomic journey with a split ortholinear like this, or would you go straight to something more “extreme”?
☕ Support
Enjoy the insights, guides and reviews? Buy me a coffee to fund more ergo-keyboard research and guides.
Thanks for reading!
Bartosz